This article is part of Rootstock’s series “Building DeFi on Bitcoin” exploring different solutions and integrations on the Rootstock blockchain that enable scaling Bitcoin, bringing DeFi capabilities to the world’s first blockchain.
OpenOcean, the DEX aggregator, recently announced its integration with Rootstock, bringing the community with a decentralized way to seamlessly swap ecosystem tokens including RBTC, WBTC, SOV, RIF, and others.
In this guide, we explore the steps to getting started with OpenOcean.
Steps to seamless Rootstock swapping on OpenOcean
Step 1: Go to app.openocean.finance to find the trading front-end.
Step 2: Select the Network
In the top right corner, open the dropdown menu and select the Rootstock network. Next, connect your wallet to OpenOcean. If you haven’t added the Rootstock network to your wallet, this may need to be added manually from ChainList.

Bonus tip – Click the star to favorite your chain so it’s always at the top!
Step 3: Prepare Your Swap
- In the “From” section, select the token you wish to swap from the dropdown menu and enter the amount you wish to trade. Ensure you have enough RBTC (the native Rootstock token) for gas fees.
- You can also trade any custom token by pasting its address into the search bar, or choose from the trending, available, or favorite tokens in your list, provided OpenOcean supports the liquidity pool.
- Choose the token you want to receive in the “To” section.

Step 4: Approve the Tokens
- If you’re swapping non-native tokens (such as ERC-20 tokens on Rootstock), you’ll need to approve them first. Opt to unlock only the necessary amount or choose infinite unlock for easier convenience
- Confirm the transaction in the wallet which you’re using by signing it in the pop-up window.

Step 5: Confirm and Swap
- Press the Swap Now button. A detailed window will appear; review all the information to ensure it is correct, then click Confirm Order.
- Your wallet will ask for your confirmation to proceed with the swap.
![]()
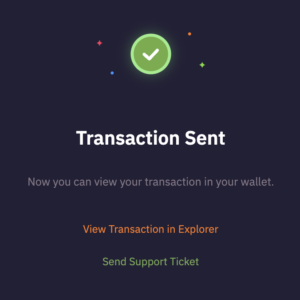
Step 6: Transaction Completion
Once the transaction is sent, a confirmation window titled “Transaction Sent” will pop up. You can click View on Explorer to see the details of your transaction or view past transactions at the bottom left side of the page.
Congratulations! You have successfully executed your first swap on OpenOcean using the Rootstock blockchain. Feel free to explore the platform and check out our other guides for more functionalities and tips.
About OpenOcean
OpenOcean is the leading DEX aggregator, integrating 1000+ liquidity sources across 30+ blockchains into one seamless trading interface, to bring users the best swap returns on their DeFi trading. OpenOcean’s intelligent routing algorithm optimizes swaps for maximum returns and is completely free to use. The platform also provides users with API/SDK, Widget and a tailor-made user interface to support their specific investment strategy.